Step into the light with the BenQ ScreenBar Halo, where premium design meets unparalleled functionality, transforming your workspace into a beacon of innovation.
If you’ve seen my videos or read my articles on budget monitor light then you’ll know, the monitor lights from BenQ are the ones that set the standard.
Ever since I unboxed my first monitor light, it’s been a mainstay on any setup and every monitor I’ve had. But now it’s time to unveil the premium contender that’s setting those benchmarks.
In the box, you’ll get the ScreenBar Halo itself, a wireless controller, three triple A batteries for the wireless controller and a curved monitor accessory attachment. There’s another small box inside, which contains, a pad accessory to add to the monitor light when attaching to a slim monitor and the documentation.
First thoughts about the light bar, the build quality of the light is immediately apparent, it has a premium feel about it. It’s hefty, solid feel with a metallic grey matte finish that screams high-end, comes from the aluminium alloy and plastic in sections that it is made out of. It’s clear that BenQ hasn’t compromised on materials or craftsmanship in this monitor light. The width of the light from end to end is 50cm. The cable which is permanently attached to the monitor light is 1.5m and has a USB-A plug at the other end.
Unlike a lot of monitor lights that I’ve reviewed previously, the mount section is not adjustable like others which clamp onto the monitor, with BenQ’s patented design, this light is going to fit the majority of different screens and monitors from flat, to thin to curved ones. All thanks to the counterweight mechanism and the felted sections, which are going to help the light stay on your monitor firmly without moving.
On the back of the light bar, there’s another light, for that rear, Halo like illumination, compared to other monitor lights, the rear illumination would usually come from lights positioned on the top side of the light bar, but with this light it’s found on this section at the back. The lamp head section is fully adjustable so you can find the perfect position that lights up your environment when it is mounted.
With the wireless controller, you’re going to be able to control all of the settings of the monitor light directly. Unlike other monitor lights, there are no buttons on the light bar itself, so the only way to control the light is with the wireless controller. As it says in the name, it’s wireless so there is no physical connection between this and the monitor light.
The controller’s dial, allows you to adjust each of the variables, rotating really smoothly, allowing you to precisely fine tune those adjustments of temperature and brightness across the different stepped intensities or temperature. The touch controls on the controller, are colour temperature, brightness intensity, favourite setting, light mode and auto dimming.
The BenQ ScreenBar Halo isn’t just another monitor light; it’s a game-changer. With its unique asymmetrical optical design, it ensures a wide and balanced illumination without any reflective glare on your screen, which is a common issue with traditional lighting options like lamps and room lights, and it does this by altering the natural way the light would normally come out of here which in turn, effectively brightens your desk without the unnecessary spill of light anywhere else.
It has three light modes, the normal front light, which illuminates your desk, an immersive back halo light, which illuminates behind your monitor, that provides bias lighting, enhancing your visual comfort and the ambiance of your environment, and both of front and back light, with the front light slightly dimming to balance the overall effect of the light.
But what really sets it apart is the weighted wireless controller. Another premium part of this whole setup, which for me, fits perfectly and actually matches the colours of my mouse and keyboard.
The weighty wireless controller allows you to adjust the settings all from the comfort of your seat. For those long work sessions, the real-time auto-dimming feature automatically supplements the ambient light to the recommended 500 lux.
What I really like about this controller, is the touch controlled interface, the centre button turns the light on and off. Pressing the colour temperature button, will illuminate the outer ring LED, allowing you to easily adjust the temperature from a warm 2700K to a cool 6500k, with a simple turn of the dial. Switching to the brightness adjustment, brings up the same outer ring, allowing you to increase or decrease the brightness up to 800 lux.
If there’s a favourite colour temperature and brightness that you want to preset, adjust to those settings, hold the heart favourite button down for three seconds and now every time you press the favourite button, guess what, your favourite setting comes on.
You’ve got the auto dimming function, which detects the ambient surrounding lighting conditions of your room and automatically adjusts the lighting to 500 lux. So as the darkness sets in and your room gets darker, the light will automatically compensate the decrease in natural light by increasing the brightness of the monitor light.
I like to think of the auto dimming function, like having a personal lighting assistant that knows exactly what you need and when you need it, even before you ever thought you needed it.
The mode button, which switches between the lights three modes which should cater for every need, whether it’s focused work or ambient backlighting for gaming.
Unfortunately with both front and back lights on, they can’t be independently controlled, so altering the temperature or brightness on one will also change the other.
Installing the ScreenBar Halo is designed to be a straightforward process.
Thanks to its design, it’s made to fit most monitors without taking up desk space or causing damage and if you have a curved monitor or ultra thin monitor than you can attach and use the additional accessories that came in the box.
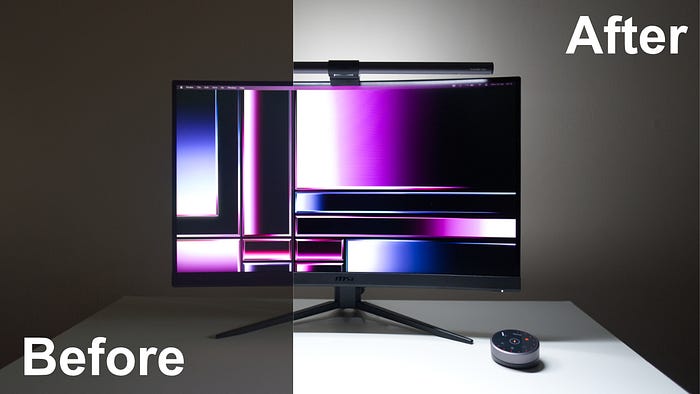
The light spread of the beam that comes out of this light bar, is by far the best I’ve seen, at it’s brightest, exactly where I need it and evenly spread, front and centre of my desk, with, as you’d expect even diminished light the further away in every direction away from the light.
While BenQ make lesser smaller iterations of this light, the Screenbar, which is just the Screenbar, with no controller module at all and the Screenbar plus, which comes with a wired controller module, The ScreenBar Halo is for anyone who takes their workspace setup seriously, and with this version you get the larger size, wireless controller and the greater lighting coverage.
Whether you’re a professional working long hours, a content creator needing consistent lighting, or a gamer looking for an immersive experience, this light bar is designed to meet your needs. It’s especially great for those who have experienced digital eye strain and are looking for a solution that’s both effective and stylish.
Now, I’ve tested various budget monitor lights in the past, and while they do the job, the ScreenBar Halo is a cut above the rest.
It’s the kind of product other brands aspire to match. The build quality, the features, the performance. From the unboxing to the daily use, it all speaks to a premium experience.
So, is the BenQ ScreenBar Halo worth the investment? Absolutely. It’s more than just a light; it’s an upgrade to your entire workspace.
It’s not just a tool; it’s an enhancement to your productivity and well-being. If you’re ready to invest in your workspace, the ScreenBar Halo should be at the top of your list.
Having something like this in your setup is a statement that you value your comfort, your health, and your productivity. If you’re ready to take your setup to the next level, the ScreenBar Halo is the way to go to elevate your workspace.
If you’re interested in getting this light for your desk setup, I’ll leave the link in the description below and many thanks again to BenQ for providing this light for my to test and review, it’s greatly appreciated.
If you want to see the video version of this article, check out the link below: